我们经常使用spring的aop功能,比如声明性事务,日志打印等。但其原理是什么呢,接下来我们就详细分析spring的AOP实现原理。
使用Spring的AOP功能我们需要开启才能使用,Spring给我们提供了自定义标签启用AOP的功能。AOP常用的两个标签<aop:aspectj-autoproxy />使用注解启用AOP功能,<aop:config>使用xml配置启用AOP功能。我们分析AOP的实现也是从这两个标签开始。
1.自定义标签解析源码分析
默认的bean标签,我们通过class属性就知道注册了哪些类。自定义标签是不知道的,所以需要看源码。我们看自定义标签的解析,说白了也就是看Spring给我们默认注入了哪些bean类。
aop标签解析的整个类是org.springframework.aop.config. AopNamespaceHandler。
1.1 <aop:aspectj-autoproxy/>标签解析
从AopNamespaceHandler类的init方法中知道aop:aspectj-autoproxy/标签解析使用的是AspectJAutoProxyBeanDefinitionParser类,从AspectJAutoProxyBeanDefinitionParser类的init方法中我们看到注册AnnotationAwareAspectJAutoProxyCreator代理类。
1.2 < aop:config >标签解析
从AopNamespaceHandler类的init方法中知道config标签的解析使用ConfigBeanDefinitionParser类
进入此类的parse方法。在parse方法中开头注册了AspectJAwareAdvisorAutoProxyCreator代理,接着会对aop:config下的三个子标签分别解析,三个子标签是<aop:pointcut>,<aop:advisor>,<aop:aspect>。
1.2.1 <aop:pointcut >子标签解析
注册AspectJExpressionPointcut类,scope是prototype
1.2.2 <aop:advisor >子标签解析
解析此标签时注册了以下bean:DefaultBeanFactoryPointcutAdvisorAspectJExpressionPointcut,scope是prototype
1.2.3 <aop:aspect >子标签解析
此标签如果下面存在aop:pointcut子标签会调用解析aop:pointcut代码去解析。
其余会注册MethodLocatingFactoryBean,SimpleBeanFactoryAwareAspectInstanceFactory和AspectJPointcutAdvisor类还会针对before,after,around,after-returning,after-throwing标签增加不同的bean,如下:1
2
3
4
5
6
7
8
9
10
11
12
13
14
15if (BEFORE.equals(elementName)) {
return AspectJMethodBeforeAdvice.class;
}
else if (AFTER.equals(elementName)) {
return AspectJAfterAdvice.class;
}
else if (AFTER_RETURNING_ELEMENT.equals(elementName)) {
return AspectJAfterReturningAdvice.class;
}
else if (AFTER_THROWING_ELEMENT.equals(elementName)) {
return AspectJAfterThrowingAdvice.class;
}
else if (AROUND.equals(elementName)) {
return AspectJAroundAdvice.class;
}
2.使用分析
2.1 <aop:aspectj-autoproxy/>使用分析
我们在spring配置文件中加入aop:aspectj-autoproxy/这个标签后,就可以在类中使用aop注解了,但背后的原理是什么呢。从1.1aop:aspectj-autoproxy/标签解析 中我们知道解析此标签时注册了AnnotationAwareAspectJAutoProxyCreator的bean,那么分析aop注解的使用也是从此类开始。AnnotationAwareAspectJAutoProxyCreator的继承关系如下:
可以看到实现了BeanPostProcessor接口,BeanPostProcessor接口是spring的重要接口BeanPostProcessor源码如下。1
2
3
4
5
6public interface BeanPostProcessor {
//初始化前调用
Object postProcessBeforeInitialization(Object bean, String beanName) throws BeansException;
//初始化后调用
Object postProcessAfterInitialization(Object bean, String beanName) throws BeansException;
}
当我们使用ApplicationContext相关实现类的上下文时,spring会保证前者在实例化及依赖注入完成后,在任何初始化代码(比如配置文件中的init-method)调用之前调用;后者在初始化代码调用之后调用。
InstantiationAwareBeanPostProcessor是BeanPostProcessor的子接口,可以在Bean生命周期的另外两个时期提供扩展的回调接口,即实例化Bean之前(调用postProcessBeforeInstantiation方法)和实例化Bean之后(调用postProcessAfterInstantiation方法),该接口定义如下:1
2
3
4
5
6
7
8
9
10
11
12
13public interface InstantiationAwareBeanPostProcessor extends BeanPostProcessor {
//实例化前调用
Object postProcessBeforeInstantiation(Class<?> beanClass, String beanName) throws BeansException;
//实例化后调用
boolean postProcessAfterInstantiation(Object bean, String beanName) throws BeansException;
//装配属性时调用
PropertyValues postProcessPropertyValues(
PropertyValues pvs, PropertyDescriptor[] pds, Object bean, String beanName)
throws BeansException;
}
我们分析也是从这些接口的实现方法入手
BeanPostProcessor .postProcessBeforeInitialization空实现
BeanPostProcessor .postProcessAfterInitialization方法实现如下:1
2
3
4
5
6
7
8
9
10
11
12
13
14
15
16
17
18
19
20
21
22
23
24
25
26
27
28
29
30
31
32
33
34
35
36
37
38
39
40
41
42
43
44
45
46
47
48
49
50
51
52
53
54
55/**
* Create a proxy with the configured interceptors if the bean is
* identified as one to proxy by the subclass.
* @see #getAdvicesAndAdvisorsForBean
*/
public Object postProcessAfterInitialization(Object bean, String beanName) throws BeansException {
if (bean != null) {
//根据给定的bean的class和name构建出个key,格式beanClassName_beanName
Object cacheKey = getCacheKey(bean.getClass(), beanName);
//如果适合被代理,则需要封装指定的bean
if (!this.earlyProxyReferences.containsKey(cacheKey)) {
return wrapIfNecessary(bean, beanName, cacheKey);
}
}
return bean;
}
/**
* Wrap the given bean if necessary, i.e. if it is eligible for being proxied.
* @param bean the raw bean instance
* @param beanName the name of the bean
* @param cacheKey the cache key for metadata access
* @return a proxy wrapping the bean, or the raw bean instance as-is
*/
protected Object wrapIfNecessary(Object bean, String beanName, Object cacheKey) {
//如果bean已经被处理过
if (beanName != null && this.targetSourcedBeans.containsKey(beanName)) {
return bean;
}
//如果bean无需增强
if (Boolean.FALSE.equals(this.advisedBeans.get(cacheKey))) {
return bean;
}
//如果bean类是一个基础设施类,基础设施类不应该代理,或者配置了指定bean不需要自动代理
//如果bean是Advice,Advisor和AopInfrastructureBean的实例代表是基础设置类
if (isInfrastructureClass(bean.getClass()) || shouldSkip(bean.getClass(), beanName)) {
this.advisedBeans.put(cacheKey, Boolean.FALSE);
return bean;
}
// 如果存在增强方法则创建代理
Object[] specificInterceptors = getAdvicesAndAdvisorsForBean(bean.getClass(), beanName, null);
//如果获取到了增强则需要针对增强创建代理
if (specificInterceptors != DO_NOT_PROXY) {
//将创建的代理bean放到advisedBeans中,用于前面的判断
this.advisedBeans.put(cacheKey, Boolean.TRUE);
//创建代理
Object proxy = createProxy(bean.getClass(), beanName, specificInterceptors, new SingletonTargetSource(bean));
this.proxyTypes.put(cacheKey, proxy.getClass());
return proxy;
}
//将创建的代理bean放到advisedBeans中,用于前面的判断
this.advisedBeans.put(cacheKey, Boolean.FALSE);
return bean;
}
可以看到Spring代码的精巧,先构建出骨架然后在逐步完善,在函数中我们可以看到代理创建的雏形。当然在正式开始之前需要经过一些判断,比如是否已经处理过或者是否需要跳过的bean。Spring真正开始创建代理是从Object[] specificInterceptors = getAdvicesAndAdvisorsForBean(bean.getClass(), beanName, null);代码及以下开始的。
创建代理主要包含了两个步骤:
- 获取增强方法或者增强器
- 根据获取的增强进行代理
下面逐步分析
2.1.1获取增强方法或者增强器
AbstractAdvisorAutoProxyCreator.java类对getAdvicesAndAdvisorsForBean方法重写,代码如下:1
2
3
4
5
6
7
8
9
10
11
12
13
14
15
16
17
18
19
20
21
22
23
24
25
26
27protected Object[] getAdvicesAndAdvisorsForBean(Class beanClass, String beanName, TargetSource targetSource) {
//查找合适的增强
List advisors = findEligibleAdvisors(beanClass, beanName);
if (advisors.isEmpty()) {
return DO_NOT_PROXY;
}
return advisors.toArray();
}
/**
* Find all eligible Advisors for auto-proxying this class.
* @param beanClass the clazz to find advisors for
* @param beanName the name of the currently proxied bean
* @return the empty List, not {@code null},
* if there are no pointcuts or interceptors
* @see #findCandidateAdvisors
* @see #sortAdvisors
* @see #extendAdvisors
*/
protected List<Advisor> findEligibleAdvisors(Class beanClass, String beanName) {
List<Advisor> candidateAdvisors = findCandidateAdvisors();
List<Advisor> eligibleAdvisors = findAdvisorsThatCanApply(candidateAdvisors, beanClass, beanName);
extendAdvisors(eligibleAdvisors);
if (!eligibleAdvisors.isEmpty()) {
eligibleAdvisors = sortAdvisors(eligibleAdvisors);
}
return eligibleAdvisors;
}
这里说下Spring中的Advisor。Advisor充当Advice和Pointcut的适配器。包括Pointcut和Advice,是将Advice注入程序中Pointcut位置的代码。
我们可以看到Spring又是层层构建,清晰的描绘了aop的实现逻辑findEligibleAdvisors方法中做了两件事:
- 获取所有的增强。
- 找到所有增强中适用于bean的增强并应用。如果找不到变会返回空了。
由于我们分析的是使用注解进行的aop,即最终的代理处理类是AnnotationAwareAspectJAutoProxyCreator,此类中重写了findCandidateAdvisors方法,此方法如下:1
2
3
4
5
6
7
8
protected List<Advisor> findCandidateAdvisors() {
//获取父类中加载配置文件中的aop声明,使用注解配置aop并不是丢弃了对xml配置的支持。
List<Advisor> advisors = super.findCandidateAdvisors();
// Build Advisors for all AspectJ aspects in the bean factory.
advisors.addAll(this.aspectJAdvisorsBuilder.buildAspectJAdvisors());
return advisors;
}
调用父类中的方法super.findCandidateAdvisors()主要是从配置文件中查找所有实现了Advisor接口的bean,这里就不在分析,代码逻辑很清晰,感兴趣的读者可以自己分析下。
接下来的第二行就是查找标记了aop注解的bean并增加到结果集中。而使用的代码点就是this.aspectJAdvisorsBuilder.buildAspectJAdvisors(),该方法整体逻辑如下:
- 获取所有beanName,这一步中所有在beanFactory中注册的bean都会被提取出来。
- 遍历所有beanName,找出声明AspectJ注解的类,进行进一步的处理。
- 对标记为AspectJ注解的类进行增强器的提取。
- 将提取结果加入结果集。
方法代码如下:1
2
3
4
5
6
7
8
9
10
11
12
13
14
15
16
17
18
19
20
21
22
23
24
25
26
27
28
29
30
31
32
33
34
35
36
37
38
39
40
41
42
43
44
45
46
47
48
49
50
51
52
53
54
55
56
57
58
59
60
61
62
63
64
65
66
67
68
69
70
71
72
73
74
75
76
77
78
79
80
81
82
83 * Look for AspectJ-annotated aspect beans in the current bean factory,
* and return to a list of Spring AOP Advisors representing them.
* <p>Creates a Spring Advisor for each AspectJ advice method.
* the list of { org.springframework.aop.Advisor} beans
* #isEligibleBean
*/
public List<Advisor> buildAspectJAdvisors() {
List<String> aspectNames = null;
synchronized (this) {
aspectNames = this.aspectBeanNames;
if (aspectNames == null) {
List<Advisor> advisors = new LinkedList<Advisor>();
aspectNames = new LinkedList<String>();
//获取所有的beanName
String[] beanNames =
BeanFactoryUtils.beanNamesForTypeIncludingAncestors(this.beanFactory, Object.class, true, false);
//循环所有的beanName 找出对应的增强方法
for (String beanName : beanNames) {
//不合法的bean则略过,有子类定义规则默认返回true
if (!isEligibleBean(beanName)) {
continue;
}
// We must be careful not to instantiate beans eagerly as in this
// case they would be cached by the Spring container but would not
// have been weaved
//获取对应的bean的类型
Class beanType = this.beanFactory.getType(beanName);
if (beanType == null) {
continue;
}
//如果存在Aspect注解
if (this.advisorFactory.isAspect(beanType)) {
aspectNames.add(beanName);
AspectMetadata amd = new AspectMetadata(beanType, beanName);
if (amd.getAjType().getPerClause().getKind() == PerClauseKind.SINGLETON) {
MetadataAwareAspectInstanceFactory factory =
new BeanFactoryAspectInstanceFactory(this.beanFactory, beanName);
//解析标记AspectJ注解中的增强方法
List<Advisor> classAdvisors = this.advisorFactory.getAdvisors(factory);
if (this.beanFactory.isSingleton(beanName)) {
this.advisorsCache.put(beanName, classAdvisors);
}
else {
this.aspectFactoryCache.put(beanName, factory);
}
advisors.addAll(classAdvisors);
}
else {
// Per target or per this.
if (this.beanFactory.isSingleton(beanName)) {
throw new IllegalArgumentException("Bean with name '" + beanName +
"' is a singleton, but aspect instantiation model is not singleton");
}
MetadataAwareAspectInstanceFactory factory =
new PrototypeAspectInstanceFactory(this.beanFactory, beanName);
this.aspectFactoryCache.put(beanName, factory);
advisors.addAll(this.advisorFactory.getAdvisors(factory));
}
}
}
this.aspectBeanNames = aspectNames;
return advisors;
}
}
if (aspectNames.isEmpty()) {
return Collections.EMPTY_LIST;
}
//将结果集记录在结果中
List<Advisor> advisors = new LinkedList<Advisor>();
for (String aspectName : aspectNames) {
List<Advisor> cachedAdvisors = this.advisorsCache.get(aspectName);
if (cachedAdvisors != null) {
advisors.addAll(cachedAdvisors);
}
else {
MetadataAwareAspectInstanceFactory factory = this.aspectFactoryCache.get(aspectName);
advisors.addAll(this.advisorFactory.getAdvisors(factory));
}
}
return advisors;
}
上面代码中对增强advice的获取委托给了this.advisorFactory.getAdvisors(factory)方法,此方法代码如下:1
2
3
4
5
6
7
8
9
10
11
12
13
14
15
16
17
18
19
20
21
22
23
24
25
26
27
28
29
30
31
32
33
34
35
36
37
38
39
40
41public List<Advisor> getAdvisors(MetadataAwareAspectInstanceFactory maaif) {
//获取标记为AspectJ的类
final Class<?> aspectClass = maaif.getAspectMetadata().getAspectClass();
//获取标记为AspectJ的name
final String aspectName = maaif.getAspectMetadata().getAspectName();
//校验是否符合aop注解规则
validate(aspectClass);
// We need to wrap the MetadataAwareAspectInstanceFactory with a decorator
// so that it will only instantiate once.
final MetadataAwareAspectInstanceFactory lazySingletonAspectInstanceFactory =
new LazySingletonAspectInstanceFactoryDecorator(maaif);
final List<Advisor> advisors = new LinkedList<Advisor>();
//获取实现Advisor类的所有标识没有Pointcut的方法。
for (Method method : getAdvisorMethods(aspectClass)) {
//获取普通的增强器
Advisor advisor = getAdvisor(method, lazySingletonAspectInstanceFactory, advisors.size(), aspectName);
if (advisor != null) {
advisors.add(advisor);
}
}
// If it's a per target aspect, emit the dummy instantiating aspect.
if (!advisors.isEmpty() && lazySingletonAspectInstanceFactory.getAspectMetadata().isLazilyInstantiated()) {
//如果寻找的增强器不为空而且又配置了增强延迟初始化那么需要在首位加入同步实例化增强器
Advisor instantiationAdvisor = new SyntheticInstantiationAdvisor(lazySingletonAspectInstanceFactory);
advisors.add(0, instantiationAdvisor);
}
// Find introduction fields.
//获取DeclareParents 注解
for (Field field : aspectClass.getDeclaredFields()) {
Advisor advisor = getDeclareParentsAdvisor(field);
if (advisor != null) {
advisors.add(advisor);
}
}
return advisors;
}
此方法的逻辑是
- 完成对增强器的获取,包括获取注解以及根据注解生成增强的步骤。
- 如果配置中将增强配置了延迟初始化,那么在首位加入同步实例化增强器保证增强使用之前的实例化
- 对DeclareParents注解的获取。
下面详细讲解每个步骤
普通增强器获取
普通增强器的获取是通过Advisor advisor = getAdvisor(method, lazySingletonAspectInstanceFactory, advisors.size(), aspectName);代码获取1
2
3
4
5
6
7
8
9
10
11
12
13
14public Advisor getAdvisor(Method candidateAdviceMethod, MetadataAwareAspectInstanceFactory aif,
int declarationOrderInAspect, String aspectName) {
//校验
validate(aif.getAspectMetadata().getAspectClass());
//切点信息获取
AspectJExpressionPointcut ajexp =
getPointcut(candidateAdviceMethod, aif.getAspectMetadata().getAspectClass());
if (ajexp == null) {
return null;
}
//根据切点信息生成对应的增强器
return new InstantiationModelAwarePointcutAdvisorImpl(
this, ajexp, aif, candidateAdviceMethod, declarationOrderInAspect, aspectName);
}
(1)切点信息获取
切点信息获取就是指定注解的表达式信息获取,如@Before("test")1
2
3
4
5
6
7
8
9
10
11
12
13
14
15
16
17
18
19
20
21
22
23
24
25
26
27
28
29
30
31
32
33
34
35
36
37
38private AspectJExpressionPointcut getPointcut(Method candidateAdviceMethod, Class<?> candidateAspectClass) {
//获取方法上注解
AspectJAnnotation<?> aspectJAnnotation =
AbstractAspectJAdvisorFactory.findAspectJAnnotationOnMethod(candidateAdviceMethod);
if (aspectJAnnotation == null) {
return null;
}
//使用AspectJExpressionPointcut 实例封装获取的信息
AspectJExpressionPointcut ajexp =
new AspectJExpressionPointcut(candidateAspectClass, new String[0], new Class[0]);
//提取得到的注解中的表达式如: //@Pointcut("execution(* *.* test* (..))")中的execution( * * .* test* (..))
ajexp.setExpression(aspectJAnnotation.getPointcutExpression());
return ajexp;
}
protected static AspectJAnnotation findAspectJAnnotationOnMethod(Method method) {
//设置敏感的注解类
Class<? extends Annotation>[] classesToLookFor = new Class[] {
Before.class, Around.class, After.class, AfterReturning.class, AfterThrowing.class, Pointcut.class};
for (Class<? extends Annotation> c : classesToLookFor) {
AspectJAnnotation foundAnnotation = findAnnotation(method, c);
if (foundAnnotation != null) {
return foundAnnotation;
}
}
return null;
}
//获取指定方法上的注解并使用AspectJAnnotation封装
private static <A extends Annotation> AspectJAnnotation<A> findAnnotation(Method method, Class<A> toLookFor) {
A result = AnnotationUtils.findAnnotation(method, toLookFor);
if (result != null) {
return new AspectJAnnotation<A>(result);
}
else {
return null;
}
}
(2)根据切点信息生成增强。所有的增强都由Advisor的实现类InstantiationModelAwarePointcutAdvisorImpl统一封装的。1
2
3
4
5
6
7
8
9
10
11
12
13
14
15
16
17
18
19
20
21
22
23
24
25
26
27
28public InstantiationModelAwarePointcutAdvisorImpl(AspectJAdvisorFactory af, AspectJExpressionPointcut ajexp,
MetadataAwareAspectInstanceFactory aif, Method method, int declarationOrderInAspect, String aspectName) {
this.declaredPointcut = ajexp;
this.method = method;
this.atAspectJAdvisorFactory = af;
this.aspectInstanceFactory = aif;
this.declarationOrder = declarationOrderInAspect;
this.aspectName = aspectName;
if (aif.getAspectMetadata().isLazilyInstantiated()) {
// Static part of the pointcut is a lazy type.
Pointcut preInstantiationPointcut =
Pointcuts.union(aif.getAspectMetadata().getPerClausePointcut(), this.declaredPointcut);
// Make it dynamic: must mutate from pre-instantiation to post-instantiation state.
// If it's not a dynamic pointcut, it may be optimized out
// by the Spring AOP infrastructure after the first evaluation.
this.pointcut = new PerTargetInstantiationModelPointcut(this.declaredPointcut, preInstantiationPointcut, aif);
this.lazy = true;
}
else {
// A singleton aspect.
this.instantiatedAdvice = instantiateAdvice(this.declaredPointcut);
this.pointcut = declaredPointcut;
this.lazy = false;
}
}
在封装过程中只是简单地将信息封装在类的实例中,所有的信息单纯地赋值,在实例初始化的过程中还完成了对于增强器的初始化。因为不同的增强所体现的逻辑是不同的,比如@Be-fore(“test()”)与@After(“test()”)标签的不同就是增强器增强的位置不同,所以就需要不同的增强器来完成不同的逻辑,而根据注解中的信息初始化对应的增强器就是在instantiateAdvice函数中实现的。1
2
3
4
5
6
7
8
9
10
11
12
13
14
15
16
17
18
19
20
21
22
23
24
25
26
27
28
29
30
31
32
33
34
35
36
37
38
39
40
41
42
43
44
45
46
47
48
49
50
51
52
53
54
55
56
57
58
59
60
61
62
63
64
65
66
67
68
69
70
71
72
73
74
75private Advice instantiateAdvice(AspectJExpressionPointcut pcut) {
return this.atAspectJAdvisorFactory.getAdvice(
this.method, pcut, this.aspectInstanceFactory, this.declarationOrder, this.aspectName);
}
public Advice getAdvice(Method candidateAdviceMethod, AspectJExpressionPointcut ajexp,
MetadataAwareAspectInstanceFactory aif, int declarationOrderInAspect, String aspectName) {
Class<?> candidateAspectClass = aif.getAspectMetadata().getAspectClass();
validate(candidateAspectClass);
AspectJAnnotation<?> aspectJAnnotation =
AbstractAspectJAdvisorFactory.findAspectJAnnotationOnMethod(candidateAdviceMethod);
if (aspectJAnnotation == null) {
return null;
}
// If we get here, we know we have an AspectJ method.
// Check that it's an AspectJ-annotated class
if (!isAspect(candidateAspectClass)) {
throw new AopConfigException("Advice must be declared inside an aspect type: " +
"Offending method '" + candidateAdviceMethod + "' in class [" +
candidateAspectClass.getName() + "]");
}
if (logger.isDebugEnabled()) {
logger.debug("Found AspectJ method: " + candidateAdviceMethod);
}
AbstractAspectJAdvice springAdvice;
switch (aspectJAnnotation.getAnnotationType()) {
case AtBefore:
springAdvice = new AspectJMethodBeforeAdvice(candidateAdviceMethod, ajexp, aif);
break;
case AtAfter:
springAdvice = new AspectJAfterAdvice(candidateAdviceMethod, ajexp, aif);
break;
case AtAfterReturning:
springAdvice = new AspectJAfterReturningAdvice(candidateAdviceMethod, ajexp, aif);
AfterReturning afterReturningAnnotation = (AfterReturning) aspectJAnnotation.getAnnotation();
if (StringUtils.hasText(afterReturningAnnotation.returning())) {
springAdvice.setReturningName(afterReturningAnnotation.returning());
}
break;
case AtAfterThrowing:
springAdvice = new AspectJAfterThrowingAdvice(candidateAdviceMethod, ajexp, aif);
AfterThrowing afterThrowingAnnotation = (AfterThrowing) aspectJAnnotation.getAnnotation();
if (StringUtils.hasText(afterThrowingAnnotation.throwing())) {
springAdvice.setThrowingName(afterThrowingAnnotation.throwing());
}
break;
case AtAround:
springAdvice = new AspectJAroundAdvice(candidateAdviceMethod, ajexp, aif);
break;
case AtPointcut:
if (logger.isDebugEnabled()) {
logger.debug("Processing pointcut '" + candidateAdviceMethod.getName() + "'");
}
return null;
default:
throw new UnsupportedOperationException(
"Unsupported advice type on method " + candidateAdviceMethod);
}
// Now to configure the advice...
springAdvice.setAspectName(aspectName);
springAdvice.setDeclarationOrder(declarationOrderInAspect);
String[] argNames = this.parameterNameDiscoverer.getParameterNames(candidateAdviceMethod);
if (argNames != null) {
springAdvice.setArgumentNamesFromStringArray(argNames);
}
springAdvice.calculateArgumentBindings();
return springAdvice;
}
从函数中可以看到,Spring会根据不同的注解生成不同的增强器,例如AtBefore会对应AspectJMethodBeforeAdvice,而在AspectJMethodBeforeAdvice中完成了增强方法的逻辑。具体的实现感兴趣的读者可以自己看看。
寻找匹配的增强器
前面的函数中已经完成了所有增强器的解析,但是对于所有增强器来讲,并不一定都适用于当前的Bean,还要挑取出适合的增强器,也就是满足我们配置的通配符的增强器。具体实现在AbstractAdvisorAutoProxyCreator.findAdvisorsThatCanApply中。1
2
3
4
5
6
7
8
9
10
11
12protected List<Advisor> findAdvisorsThatCanApply(
List<Advisor> candidateAdvisors, Class beanClass, String beanName) {
ProxyCreationContext.setCurrentProxiedBeanName(beanName);
try {
//过滤已经得到的advisors
return AopUtils.findAdvisorsThatCanApply(candidateAdvisors, beanClass);
}
finally {
ProxyCreationContext.setCurrentProxiedBeanName(null);
}
}
继续看findAdvisorsThatCanApply:1
2
3
4
5
6
7
8
9
10
11
12
13
14
15
16
17
18
19
20
21
22
23
24
25public static List<Advisor> findAdvisorsThatCanApply(List<Advisor> candidateAdvisors, Class<?> clazz) {
if (candidateAdvisors.isEmpty()) {
return candidateAdvisors;
}
List<Advisor> eligibleAdvisors = new LinkedList<Advisor>();
//首先处理引介增强
for (Advisor candidate : candidateAdvisors) {
if (candidate instanceof IntroductionAdvisor && canApply(candidate, clazz)) {
eligibleAdvisors.add(candidate);
}
}
boolean hasIntroductions = !eligibleAdvisors.isEmpty();
for (Advisor candidate : candidateAdvisors) {
//引介增强已经处理
if (candidate instanceof IntroductionAdvisor) {
// already processed
continue;
}
//对于普通bean 的处理
if (canApply(candidate, clazz, hasIntroductions)) {
eligibleAdvisors.add(candidate);
}
}
return eligibleAdvisors;
}
findAdvisorsThatCanApply函数的主要功能是寻找所有增强器中适用于当前class的增强器。引介增强与普通的增强是处理不一样的,所以分开处理。而对于真正的匹配在canApply中实现。实现的逻辑很简单就是循环之前查找出来的所有增强,逐个判断该增强是否匹配当前的Bean,匹配则加进Advisor结果集的list中。
2.1.3 创建代理
上面的代码已经将获取的增强器讲完了,那么接下来便是根据增强器对匹配的bean创建代理了。我们是否忘了从哪里分析了,那再回顾下,从AbstractAutoProxyCreator.wrapIfNecessary方法分析开始,先是获取匹配的增强器调用getAdvicesAndAdvisorsForBean方法。然后再是创建代理createProxy方法,接下来我们将会分析此方法
1 | protected Object createProxy( |
对于代理类的创建及处理,Spring委托给力ProxyFactory去处理,而在此函数中主要是对ProxyFactory的初始化操作,进而对真正的创建代理做准备,这些初始化内容包括:
- 获取当前类中的属性
- 添加代理接口
- 封装Advisor并加入到ProxyFactory中。
- 设置要代理的类。
- Spring还未子类提供了定制的方法customizeProxyFactory,子类可以在此方法中进行对ProxyFactory的进一步封装。
- 进行获取代理操作。
其中封装Advisor并加入到ProxyFactory中以及创建代理是两个相对繁琐的过程,可以通过ProxyFactory提供的addAdvisor方法直接将增强器织入代理创建工厂中,但是将拦截器封装为增强器还是需要一定逻辑的,代码如下:1
2
3
4
5
6
7
8
9
10
11
12
13
14
15
16
17
18
19
20
21
22
23
24
25
26
27
28
29
30
31
32
33
34
35
36
37
38
39
40
41
42
43
44
45
46
47
48
49
50
51
52
53
54
55
56
57
58
59
60
61
62
63
64/**
* Determine the advisors for the given bean, including the specific interceptors
* as well as the common interceptor, all adapted to the Advisor interface.
* @param beanName the name of the bean
* @param specificInterceptors the set of interceptors that is
* specific to this bean (may be empty, but not null)
* @return the list of Advisors for the given bean
*/
protected Advisor[] buildAdvisors(String beanName, Object[] specificInterceptors) {
// 解析注册的所有InterceptorName
Advisor[] commonInterceptors = resolveInterceptorNames();
List<Object> allInterceptors = new ArrayList<Object>();
if (specificInterceptors != null) {
//加入拦截器
allInterceptors.addAll(Arrays.asList(specificInterceptors));
if (commonInterceptors != null) {
if (this.applyCommonInterceptorsFirst) {
allInterceptors.addAll(0, Arrays.asList(commonInterceptors));
}
else {
allInterceptors.addAll(Arrays.asList(commonInterceptors));
}
}
}
if (logger.isDebugEnabled()) {
int nrOfCommonInterceptors = (commonInterceptors != null ? commonInterceptors.length : 0);
int nrOfSpecificInterceptors = (specificInterceptors != null ? specificInterceptors.length : 0);
logger.debug("Creating implicit proxy for bean '" + beanName + "' with " + nrOfCommonInterceptors +
" common interceptors and " + nrOfSpecificInterceptors + " specific interceptors");
}
Advisor[] advisors = new Advisor[allInterceptors.size()];
for (int i = 0; i < allInterceptors.size(); i++) {
//将拦截器转换为advisor
advisors[i] = this.advisorAdapterRegistry.wrap(allInterceptors.get(i));
}
return advisors;
}
public Advisor wrap(Object adviceObject) throws UnknownAdviceTypeException {
//如果本身就是Advisor类型,无需处理直接转换
if (adviceObject instanceof Advisor) {
return (Advisor) adviceObject;
}
//因为此封装方法只对Advisor于advice两种类型的数据有效,如果不是将不能封装。
if (!(adviceObject instanceof Advice)) {
throw new UnknownAdviceTypeException(adviceObject);
}
Advice advice = (Advice) adviceObject;
if (advice instanceof MethodInterceptor) {
// So well-known it doesn't even need an adapter.
//如果是MethodInterceptor类型则使用DefaultPointcutAdvisor封装。
return new DefaultPointcutAdvisor(advice);
}
for (AdvisorAdapter adapter : this.adapters) {
// Check that it is supported.
if (adapter.supportsAdvice(advice)) {
return new DefaultPointcutAdvisor(advice);
}
}
throw new UnknownAdviceTypeException(advice);
}
由于Spring中涉及过多的拦截器、增强器、增强方法等方式来对逻辑进行增强,所以非常有必要统一封装成Advisor来进行代理的创建,完成了增强的封装过程,那么解析最重要的一步就是代理的创建于获取了。1
2
3public Object getProxy(ClassLoader classLoader) {
return createAopProxy().getProxy(classLoader);
}
创建代理1
2
3
4
5
6
7
8
9
10
11
12
13
14
15
16
17
18
19
20
21
22
23
24protected final synchronized AopProxy createAopProxy() {
if (!this.active) {
activate();
}
//创建代理
return getAopProxyFactory().createAopProxy(this);
}
public AopProxy createAopProxy(AdvisedSupport config) throws AopConfigException {
if (config.isOptimize() || config.isProxyTargetClass() || hasNoUserSuppliedProxyInterfaces(config)) {
Class targetClass = config.getTargetClass();
if (targetClass == null) {
throw new AopConfigException("TargetSource cannot determine target class: " +
"Either an interface or a target is required for proxy creation.");
}
if (targetClass.isInterface()) {
return new JdkDynamicAopProxy(config);
}
return CglibProxyFactory.createCglibProxy(config);
}
else {
return new JdkDynamicAopProxy(config);
}
}
到此已经完成了代理的创建,我们可以看到Spring会动态的选择使用Cglib或者jdk创建代理。这里就不细分析了。
至此我们分析完了<aop:aspectj-autoproxy/>标签创建Spring的AOP全流程。
2.2 <aop:config>使用分析
前面分析完了在使用<aop:aspectj-autoproxy/>标签时,aop的实现原理,接着分析<aop:config>实现原理。<aop:config>在 1.2节中解析此标签时我们看到注册了AspectJAwareAdvisorAutoProxyCreator看到此类是不是很熟悉,看下此类的集成关系图: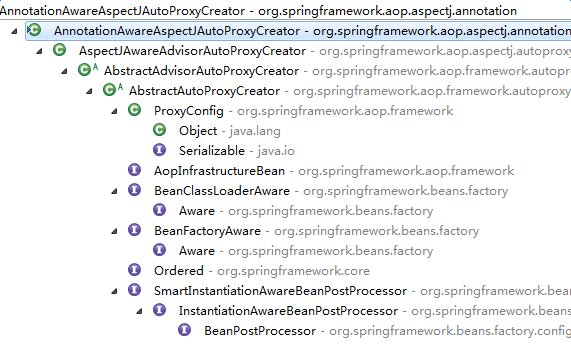
看到了吧,我们使用注解aop的AnnotationAwareAspectJAutoProxyCreator就是直接继承此类的,回头看看2.1节的AnnotationAwareAspectJAutoProxyCreator此类继承关系图。如果你理解了之前对注解AOP实现原理的分析,那么相信你对此标签的实现原理也是了然于胸了。这里主要说下步骤,就不进行相信分析了
- 解析
<aop:config>标签时,获取对应的子标签,注册对应的Bean,例如Advisor和pointcut。 - 程序运行调用getbean获取bean时执行
AnnotationAwareAspectJAutoProxyCreator的postProcessBeforeInstantiation方法进行代理的创建。postProcessBeforeInstantiation方法我们在之前就分析了此流程。
至此aop的流程就分析完了,感兴趣的可以留言探讨,一起学习进步。
想了解更多技术文章信息,请继续关注wiliam.s Blog,谢谢,欢迎来访!