Spring使用Environment表示应用的上下文环境,Environment接口作用可以让Spring根据不同的环境配置加载不同的配置信息。例如我们常用的测试环境和生产环境需要使用不同的数据源,通过配置环境信息即可达到无缝切换。
1.整体介绍
Environment环境代表当前应用运行时所处的环境。
整个应用环境模型包括2个关键方面:
1.1. profiles配置组(以下简称组):
一个profile组,是一个以name名称命名的、逻辑上的、要被注册到容器中的BeanDefinition的集合。简单一点说,一个profile就代表一组BeanDefinition,当是xml配置时使用
1.1.1. xml配置
ServerEnv接口1
2
3
4
5
6package me.wiliam.spring.xmlconfig.bean;
public interface ServerEnv {
void getEnvData();
}
生产环境实现类1
2
3
4
5
6
7
8
9
10
11package me.wiliam.spring.xmlconfig.bean;
public class ProductEnv implements ServerEnv {
public void getEnvData() {
System.out.println("this is product Environment");
}
}
测试环境实现类1
2
3
4
5
6
7
8
9
10
11package me.wiliam.spring.xmlconfig.bean;
public class TestEnv implements ServerEnv {
public void getEnvData() {
System.out.println("this is Test Environment");
}
}
xml配置1
2
3
4
5
6
7
8
9<beans profile="product">
<bean id="serverEnv" class="me.wiliam.spring.xmlconfig.bean.ProductEnv">
</bean>
</beans>
<beans profile="test">
<bean id="serverEnv" class="me.wiliam.spring.xmlconfig.bean.TestEnv">
</bean>
</beans>
测试类1
2
3
4
5
6
7
8
9
10
11
12
13
14
15package me.wiliam.spring.xmlconfig;
import org.springframework.context.ApplicationContext;
import org.springframework.context.support.ClassPathXmlApplicationContext;
import me.wiliam.spring.xmlconfig.bean.ServerEnv;
public class AppMain {
public static void main(String[] args) {
ApplicationContext context = new ClassPathXmlApplicationContext("me/wiliam/spring/xmlconfig/config/spring-profile.xml");
ServerEnv serverEnv = (ServerEnv)context.getBean("serverEnv");
serverEnv.getEnvData();
}
}
jvm环境变量设置1
-Dspring.profiles.active=product
执行结果1
this is product Environment
1.1.2. 注解配置
ProdcutConfig配置类1
2
3
4
5
6
7
8
9@Configuration
@Profile("product")
public class ProdcutConfig {
@Bean(name="serverEnv")
public ProductEnv productEnv(){
return new ProductEnv();
}
}
TestConfig配置类1
2
3
4
5
6
7
8
9@Configuration
@Profile("test")
public class TestConfig {
@Bean(name="serverEnv")
public TestEnv testEnv(){
return new TestEnv();
}
}
总配置1
2
3
4@Configuration
@Import({TestConfig.class,ProdcutConfig.class})
public class AppConfig {
}
测试1
2
3
4
5
6
7public class APP {
public static void main(String[] args) {
ApplicationContext context = new AnnotationConfigApplicationContext(AppConfig.class);
ServerEnv server =context.getBean(ServerEnv.class);
server.getEnvData();
}
}
jvm环境变量设置1
-Dspring.profiles.active=product
执行结果1
this is product Environment
1.1.3.配置说明总结
上面切换配置使用的是jvm环境变量配置的,如果是web环境,可以针对测试环境和生产环境在启动时增加环境变量就可以自动区分生产环境还是测试环境了。
激活profile还有其他几种方式,例如使用xml,下面说明下:
Spring通过两个不同属性来决定哪些profile可以被激活(注意:profile是可以同时激活多个的),一个属性是spring.profiles.active和spring.profiles.default。这两个常量值在Spring的AbstractEnvironment中有定义,查看AbstractEnvironment源码:1
2
3public static final String ACTIVE_PROFILES_PROPERTY_NAME = "spring.profiles.active";
public static final String DEFAULT_PROFILES_PROPERTY_NAME = "spring.profiles.default";
如果当spring.profiles.active属性被设置时,那么Spring会优先使用该属性对应值来激活Profile。当spring.profiles.active没有被设置时,那么Spring会根据spring.profiles.default属性的对应值来进行Profile进行激活。如果上面的两个属性都没有被设置,那么就不会有任务Profile被激活,只有定义在Profile之外的Bean才会被创建。我们发现这两个属性值其实是Spring容器中定义的属性,而我们在实际的开发中很少会直接操作Spring容器本身,所以如果要设置这两个属性,其实是需要定义在特殊的位置,让Spring容器自动去这些位置读取然后自动设置,这些位置主要为如下定义的地方:
- 作为SpringMVC中的DispatcherServlet的初始化参数
- 作为Web 应用上下文中的初始化参数
- 作为JNDI的入口
- 作为环境变量
- 作为虚拟机的系统参数
- 使用@AtivceProfile来进行激活:单测使用
上面的前三个Springwebmvc使用的是StandardServletEnvironment其继承StandardEnvironment,初始化时会读取ServletContext和ServletConfig的InitParameter这时就会将我们在配置文件中配置的spring.profiles.active配置项读入spring的上下文中了,然后spring就能根据配置的环境信息加载对应的配置项了。
我们在实际的使用过程中,可以定义默认的profile为开发环境,当实际部署的时候,主需要在实际部署的环境服务器中将spring.profiles.active定义在环境变量中来让Spring自动读取当前环境下的配置信息,这样就可以很好的避免不同环境而频繁修改配置文件的麻烦。
1.2.properties环境变量:
在几乎所有的应用中,Properties环境变量都扮演着非常重要的角色,且这些变量值可以来自于各种PropertySource属性源,如:properties文件、jvm虚拟机环境变量、操作系统环境变量、JNDI、Servlet上下文参数、自定义的属性对象、Map对象,等等。Environment环境对象为用户提供了方便的接口,用于配置和使用属性源。
整体类图如下:
![environment][1]
刚才提到环境模型具有2个关键方面:profiles和properties,从体系图中可以看出,properties方面的所有功能由PropertyResolver属性解决器来实现,环境模型只是通过装饰模式,在PropertyResolver功能的基础上,额外扩展出了profiles方面的功能。因此在接口方面,Environment继承自PropertyResolver,从实现类方面,AbstractEnvironment类内部持有一个PropertySourcesPropertyResolver类型对象的引用,PropertyResolver和ConfigurablePropertyResolver的接口,都委托调用了PropertySourcesPropertyResolver实现。
2.接口说明
关于PropertyResolver,我前边的文章PropertyResolver属性解析器已经进行了详细的解释,因此在本文中,我们重点关注环境模型在profiles方面的实现原理,体系图如下: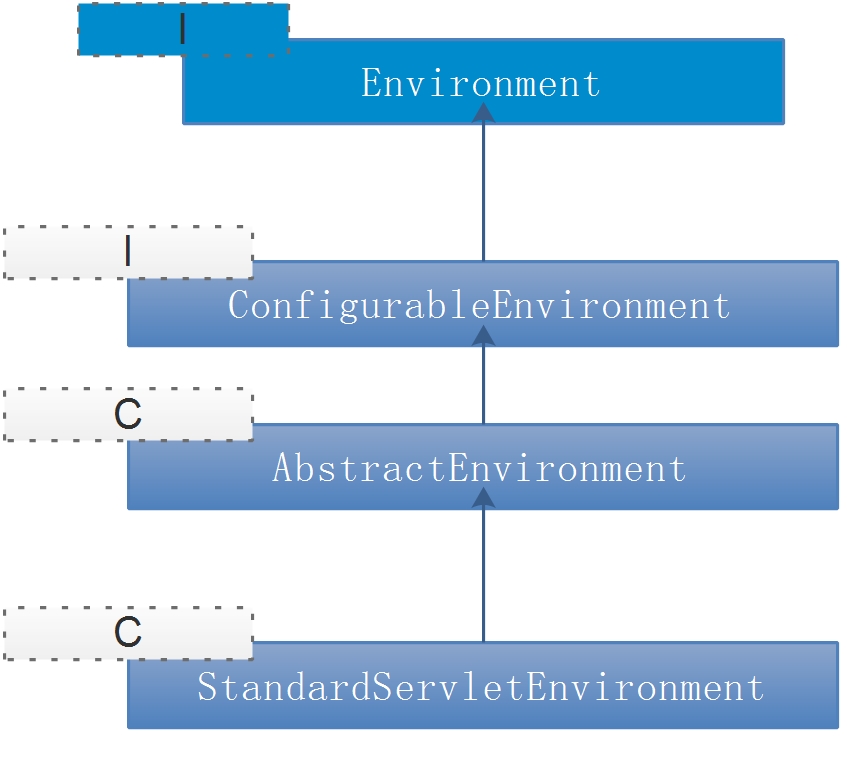
2.1.Environment接口:
1 | public interface Environment extends PropertyResolver { |
2.2.ConfigurableEnvironment:
1 | public interface ConfigurableEnvironment extends Environment, ConfigurablePropertyResolver { |
2.3.AbstractEnvironment抽象基类:
该类实际上实现了以上接口的所有方法,且额外扩展了自定义属性源的入口:
protected void customizePropertySources(MutablePropertySources propertySources);
但是因为初始时属性源集合只是一个空集合,没有任何意义,因为该类定义为抽象基类,不能直接实例化使用。部分代码如下:1
2
3
4
5
6
7
8
9
10
11
12
13
14
15
16
17
18
19
20
21
22
23
24
25
26
27
28/**
* 部分代码
* @author lixin
*
*/
public class AbstractEnvironment {
/**
* 可变属性源集合
*/
private final MutablePropertySources propertySources = new MutablePropertySources();
/**
* 在构造方法中直接调用自定义属性源集合
*/
public AbstractEnvironment() {
customizePropertySources(this.propertySources);
}
/**
* 自定义属性源集合,
* 默认空实现,子类可重写,用来配置属性源。
*
* @param propertySources
*/
protected void customizePropertySources(MutablePropertySources propertySources) {
}
}
2.4.StandardEnvironment:
该类定义了Spring应用运行时使用的标准环境,其实就是重写了customizePropertySources方法,先后追加了jvm虚拟机环境变量属性源和操作系统环境变量属性源这两个属性源。当然对于特殊的spring运行环境,我们可以创建标准环境的子类,以实现属性源的扩充,比如:StandardServletEnvironment类,用于web应用环境。1
2
3
4
5
6
7
8
9
10
11
12
13
14
15
16
17public class StandardEnvironment extends AbstractEnvironment {
// 操作系统环境变量属性源的名称
public static final String SYSTEM_ENVIRONMENT_PROPERTY_SOURCE_NAME = "systemEnvironment";
// jvm虚拟机系统环境变量属性源的名称
public static final String SYSTEM_PROPERTIES_PROPERTY_SOURCE_NAME = "systemProperties";
protected void customizePropertySources(MutablePropertySources propertySources) {
// 追加虚拟机环境变量属性源
propertySources.addLast(new MapPropertySource(SYSTEM_PROPERTIES_PROPERTY_SOURCE_NAME, getSystemProperties()));
// 追加操作系统环境变量属性源
propertySources.addLast(new SystemEnvironmentPropertySource(SYSTEM_ENVIRONMENT_PROPERTY_SOURCE_NAME, getSystemEnvironment()));
}
}
以上就是spring框架的基本环境体系。
[1]:http://imgcdn.yalongkeji.com/blog/20170225/120820499.jpg
[2]:http://imgcdn.yalongkeji.com/blog/20170225/122833815.jpg
想了解更多技术文章信息,请继续关注wiliam.s Blog,谢谢,欢迎来访!